

Table Of Contents
- Introduction to Real-time Web Applications
- Understanding the Fundamentals
- Setting Up Broadcasting in Laravel
- Understanding Channel Types
- Customizing Event Broadcasting
- Implementing Common Real-time Features
- Self-hosting WebSockets with Laravel WebSockets
- Advanced Broadcasting Techniques
- Scaling Real-time Applications
- Testing Broadcasting
- Security Considerations
- Best Practices for Broadcasting
- Real-World Implementation Examples
- Troubleshooting Common Issues
- Conclusion
Introduction to Real-time Web Applications
The modern web has evolved far beyond static pages and simple request-response cycles. Today's users expect dynamic, real-time experiences—messages that appear instantly, notifications that pop up without refreshing, dashboards that update in real-time, and collaborative interfaces where multiple users can work simultaneously.
Laravel Broadcasting provides a powerful, elegant abstraction over WebSocket technology, making it straightforward to add real-time features to your applications. By combining Laravel's event system with broadcasting channels, you can push server-side events directly to your frontend, creating truly reactive applications.
In this comprehensive guide, we'll explore Laravel Broadcasting from the ground up, covering everything from basic implementation to advanced patterns and scaling strategies.
Understanding the Fundamentals
What is Broadcasting?
Broadcasting in Laravel refers to the process of sending server-side events to client-side applications in real-time. Traditional web applications require a page refresh or AJAX polling to receive updates, but broadcasting pushes updates instantly when they occur.
How Laravel Broadcasting Works
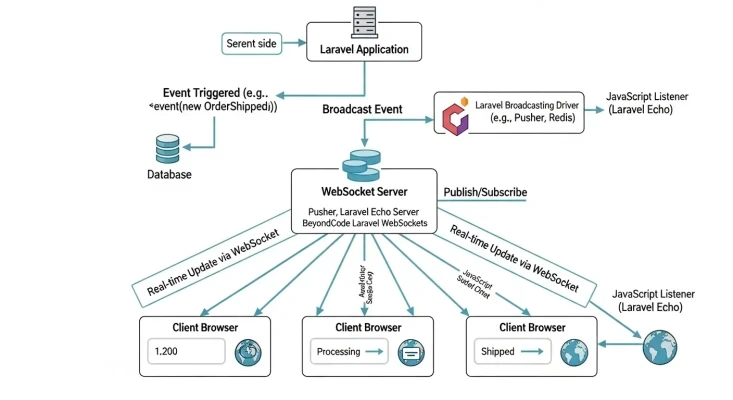
Laravel Broadcasting consists of several components working together:
- Events: Server-side events that should be broadcast
- Channels: Pathways that events are broadcast on
- WebSocket Server: A server that maintains persistent connections with clients
- Receivers: Client-side JavaScript that listens for and reacts to broadcasted events
When an event occurs in your Laravel application (like a new message being sent), it can be broadcast over a WebSocket connection to all connected clients, who then update their interfaces accordingly.
Setting Up Broadcasting in Laravel
Configuration Basics
First, let's set up broadcasting in your Laravel application:
- Ensure your
config/broadcasting.phpfile is properly configured - Choose a broadcast driver (Pusher, Redis, or Laravel WebSockets)
- Set the appropriate environment variables
// config/broadcasting.php
'default' => env('BROADCAST_DRIVER', 'pusher'),

'connections' => [
    'pusher' => [
        'driver' => 'pusher',
        'key' => env('PUSHER_APP_KEY'),
        'secret' => env('PUSHER_APP_SECRET'),
        'app_id' => env('PUSHER_APP_ID'),
        'options' => [
            'cluster' => env('PUSHER_APP_CLUSTER'),
            'useTLS' => true,
        ],
    ],

    'redis' => [
        'driver' => 'redis',
        'connection' => 'default',
    ],

    'log' => [
        'driver' => 'log',
    ],

    'null' => [
        'driver' => 'null',
    ],
],
Installing Required Packages
To use broadcasting, you'll need additional packages:
# For Pusher
composer require pusher/pusher-php-server

# For Laravel WebSockets (self-hosted solution)
composer require beyondcode/laravel-websockets
On the frontend, you'll need Laravel Echo:
npm install --save laravel-echo pusher-js
Creating Your First Broadcast Event
Let's create a simple event to broadcast:
php artisan make:event NewMessage --broadcaster
This creates an event that implements the ShouldBroadcast interface:
namespace App\Events;

use App\Models\Message;
use Illuminate\Broadcasting\Channel;
use Illuminate\Broadcasting\InteractsWithSockets;
use Illuminate\Broadcasting\PresenceChannel;
use Illuminate\Broadcasting\PrivateChannel;
use Illuminate\Contracts\Broadcasting\ShouldBroadcast;
use Illuminate\Foundation\Events\Dispatchable;
use Illuminate\Queue\SerializesModels;

class NewMessage implements ShouldBroadcast
{
    use Dispatchable, InteractsWithSockets, SerializesModels;

    public $message;

    public function __construct(Message $message)
    {
        $this->message = $message;
    }

    public function broadcastOn()
    {
        return new PrivateChannel('chat.' . $this->message->room_id);
    }
}
Setting Up Laravel Echo
In your JavaScript, set up Laravel Echo to listen for broadcasts:
// bootstrap.js or app.js
import Echo from 'laravel-echo';
import Pusher from 'pusher-js';

window.Pusher = Pusher;

window.Echo = new Echo({
    broadcaster: 'pusher',
    key: process.env.MIX_PUSHER_APP_KEY,
    cluster: process.env.MIX_PUSHER_APP_CLUSTER,
    forceTLS: true
});
Listening for Broadcasts
Now you can listen for broadcasted events:
Echo.private(`chat.${roomId}`)
    .listen('NewMessage', (e) => {
        console.log(e.message);
        // Update UI with the new message
    });
Understanding Channel Types
Laravel Broadcasting supports three types of channels, each with different security and use cases:
Public Channels
Public channels are accessible to anyone who knows the channel name:
public function broadcastOn()
{
    return new Channel('announcements');
}
On the client:
Echo.channel('announcements')
    .listen('NewAnnouncement', (e) => {
        console.log(e);
    });
Private Channels
Private channels require authentication:
public function broadcastOn()
{
    return new PrivateChannel('chat.' . $this->message->room_id);
}
You'll need to set up authorization routes in your routes/channels.php file:
Broadcast::channel('chat.{roomId}', function ($user, $roomId) {
    return $user->canAccessChatRoom($roomId);
});
Then listen on the client:
Echo.private(`chat.${roomId}`)
    .listen('NewMessage', (e) => {
        console.log(e.message);
    });
Presence Channels
Presence channels extend private channels by providing awareness of who's subscribed:
public function broadcastOn()
{
    return new PresenceChannel('room.' . $this->room->id);
}
Authorization:
Broadcast::channel('room.{roomId}', function ($user, $roomId) {
    if ($user->canAccessRoom($roomId)) {
        return ['id' => $user->id, 'name' => $user->name];
    }
});
Client-side usage:
Echo.join(`room.${roomId}`)
    .here((users) => {
        // Initial list of users in the channel
        console.log(users);
    })
    .joining((user) => {
        // A new user joined
        console.log(`${user.name} joined`);
    })
    .leaving((user) => {
        // A user left
        console.log(`${user.name} left`);
    })
    .listen('NewMessage', (e) => {
        // Handle the event
    });
Customizing Event Broadcasting
Customizing the Broadcast Name
By default, the fully qualified class name is used as the broadcast event name. You can customize this:
public function broadcastAs()
{
    return 'message.new';
}
Then on the client:
Echo.private(`chat.${roomId}`)
    .listen('message.new', (e) => {
        console.log(e);
    });
Customizing the Broadcast Data
You can control what data is sent with the broadcast:
public function broadcastWith()
{
    return [
        'id' => $this->message->id,
        'content' => $this->message->content,
        'user' => [
            'id' => $this->message->user->id,
            'name' => $this->message->user->name,
        ],
        'timestamp' => $this->message->created_at->toIso8601String(),
    ];
}
Broadcast Queues
Broadcasting can be resource-intensive. By implementing ShouldBroadcastNow instead of ShouldBroadcast, events are broadcast immediately. Otherwise, they're queued:
class NewMessage implements ShouldBroadcast
{
    // Will be queued
}

class UrgentAlert implements ShouldBroadcastNow
{
    // Will be broadcast immediately
}
You can also specify the queue:
public $broadcastQueue = 'broadcasts';
Implementing Common Real-time Features
Let's look at how to implement some common real-time features using Laravel Broadcasting.
Real-time Notifications
class UserNotification implements ShouldBroadcast
{
    use Dispatchable, InteractsWithSockets, SerializesModels;

    public $notification;
    public $userId;

    public function __construct($notification, $userId)
    {
        $this->notification = $notification;
        $this->userId = $userId;
    }

    public function broadcastOn()
    {
        return new PrivateChannel('user.' . $this->userId);
    }
}
Dispatch the event:
event(new UserNotification([
    'title' => 'New Comment',
    'message' => 'Someone commented on your post',
    'link' => '/posts/1#comments',
], $user->id));
Client-side listening:
Echo.private(`user.${userId}`)
    .listen('UserNotification', (e) => {
        // Show notification
        showNotification(e.notification);
    });
Live Chat System
class ChatMessageSent implements ShouldBroadcast
{
    use Dispatchable, InteractsWithSockets, SerializesModels;

    public $message;

    public function __construct(Message $message)
    {
        $this->message = $message->load('user');
    }

    public function broadcastOn()
    {
        return new PresenceChannel('chat.' . $this->message->chat_room_id);
    }

    public function broadcastWith()
    {
        return [
            'id' => $this->message->id,
            'content' => $this->message->content,
            'user' => [
                'id' => $this->message->user->id,
                'name' => $this->message->user->name,
                'avatar' => $this->message->user->avatar_url,
            ],
            'timestamp' => $this->message->created_at->diffForHumans(),
        ];
    }
}
In your controller:
public function sendMessage(Request $request, $roomId)
{
    $message = Message::create([
        'user_id' => auth()->id(),
        'chat_room_id' => $roomId,
        'content' => $request->content,
    ]);

    broadcast(new ChatMessageSent($message))->toOthers();

    return response()->json($message);
}
The toOthers() method ensures the broadcaster doesn't receive their own message.
Client-side implementation:
// Join the presence channel
const channel = Echo.join(`chat.${roomId}`);

// Listen for new messages
channel.listen('ChatMessageSent', (e) => {
    appendMessage(e.message);
});

// Show who's online
channel.here((users) => {
    users.forEach(user => addUserToOnlineList(user));
})
.joining((user) => {
    addUserToOnlineList(user);
})
.leaving((user) => {
    removeUserFromOnlineList(user);
});

// Send a message
function sendMessage() {
    const content = document.getElementById('message-input').value;

    axios.post(`/chat-rooms/${roomId}/messages`, { content })
        .then(response => {
            // The message will be added via the broadcast for consistency
            document.getElementById('message-input').value = '';
        });
}
Real-time Dashboard Updates
class MetricsUpdated implements ShouldBroadcast
{
    use Dispatchable, InteractsWithSockets, SerializesModels;

    public $metrics;

    public function __construct(array $metrics)
    {
        $this->metrics = $metrics;
    }

    public function broadcastOn()
    {
        return new PrivateChannel('dashboard');
    }
}
Update metrics in your application:
// Could be triggered by a scheduled task
public function updateDashboardMetrics()
{
    $metrics = [
        'users_count' => User::count(),
        'new_users_today' => User::whereDate('created_at', today())->count(),
        'active_sessions' => Session::where('last_activity', '>=', now()->subMinutes(5))->count(),
        'sales_today' => Order::whereDate('created_at', today())->sum('total'),
        'server_load' => sys_getloadavg()[0],
    ];

    broadcast(new MetricsUpdated($metrics));

    return $metrics;
}
Client-side dashboard updates:
Echo.private('dashboard')
    .listen('MetricsUpdated', (e) => {
        Object.entries(e.metrics).forEach(([key, value]) => {
            // Update the corresponding element
            document.getElementById(key).textContent = value;

            // Maybe add some animation to highlight changes
            animateValue(key);
        });
    });
Self-hosting WebSockets with Laravel WebSockets
While Pusher is convenient, you might want to self-host your WebSocket server for cost or privacy reasons. Laravel WebSockets provides an excellent Pusher-compatible server.
Installation and Setup
composer require beyondcode/laravel-websockets
Publish the configuration:
php artisan vendor:publish --provider="BeyondCode\LaravelWebSockets\WebSocketsServiceProvider" --tag="migrations"
php artisan migrate

php artisan vendor:publish --provider="BeyondCode\LaravelWebSockets\WebSocketsServiceProvider" --tag="config"
Configure your .env file:
BROADCAST_DRIVER=pusher
PUSHER_APP_ID=your-app-id
PUSHER_APP_KEY=your-app-key
PUSHER_APP_SECRET=your-app-secret
PUSHER_APP_CLUSTER=mt1

# Use the Laravel WebSockets server instead of Pusher
PUSHER_HOST=127.0.0.1
PUSHER_PORT=6001
PUSHER_SCHEME=http
Update your Laravel Echo configuration:
window.Echo = new Echo({
    broadcaster: 'pusher',
    key: process.env.MIX_PUSHER_APP_KEY,
    wsHost: window.location.hostname,
    wsPort: 6001,
    wssPort: 6001,
    forceTLS: false,
    disableStats: true,
});
Running the WebSocket Server
Start the WebSocket server:
php artisan websockets:serve
For production, you should run this as a daemon using Supervisor or a similar tool.
Monitoring WebSocket Connections
Laravel WebSockets comes with a dashboard to monitor connections:
// routes/web.php
Route::get('/laravel-websockets', function () {
    return view('websockets::dashboard');
});
Advanced Broadcasting Techniques
Channel Groups
You can broadcast to multiple channels at once:
public function broadcastOn()
{
    return [
        new PrivateChannel('user.' . $this->user->id),
        new PrivateChannel('admin.notifications'),
    ];
}
Conditional Broadcasting
Sometimes you only want to broadcast under certain conditions:
public function broadcastWhen()
{
    return $this->update->isSignificant();
}
Targeting Specific Users
You can send broadcasts to specific users:
$user = User::find(1);
broadcast(new ServerRestart)->toOthers();
broadcast(new PaymentProcessed)->to($user);
broadcast(new OrderShipped)->toMultiple([$user1, $user2]);
Broadcasting to Multiple Private Channels
// Get all project members
$users = $project->members;

// Broadcast to all of them
broadcast(new ProjectUpdated($project))
    ->toMultiple(
        $users->map(function ($user) {
            return new PrivateChannel('user.' . $user->id);
        })->toArray()
    );
Scaling Real-time Applications
As your application grows, you'll need to consider scaling strategies:
Queue Workers for Broadcasting
Ensure you have enough queue workers to handle broadcast events:
php artisan queue:work --queue=broadcasting
Configure multiple workers in your Supervisor configuration.
Horizontal Scaling WebSocket Servers
For high-traffic applications, you'll need multiple WebSocket servers behind a load balancer. This requires Redis for sharing information between servers:
// config/broadcasting.php
'redis' => [
    'driver' => 'redis',
    'connection' => 'default',
],

// .env
BROADCAST_DRIVER=redis
Handling Connection Limits
WebSocket servers have connection limits. Implement graceful degradation:
// Check current connections before allowing more
if ($tooManyConnections) {
    // Fallback to polling or show message
    return response()->json(['error' => 'Too many connections'], 503);
}
Testing Broadcasting
Testing real-time features can be challenging. Here are some strategies:
Faking Broadcasts
Laravel makes it easy to test that events are broadcast without actually broadcasting them:
public function test_message_broadcast_on_creation()
{
    Event::fake();

    $user = User::factory()->create();
    $room = ChatRoom::factory()->create();

    $message = Message::create([
        'user_id' => $user->id,
        'chat_room_id' => $room->id,
        'content' => 'Hello, world!',
    ]);

    Event::assertDispatched(NewMessage::class, function ($event) use ($message) {
        return $event->message->id === $message->id;
    });
}
Testing Channel Authorization
public function test_user_can_access_private_chat_channel()
{
    $user = User::factory()->create();
    $room = ChatRoom::factory()->create();

    // Add user to room
    $room->members()->attach($user->id);

    $this->actingAs($user);

    $response = $this->post('/broadcasting/auth', [
        'socket_id' => '1234.1234',
        'channel_name' => 'private-chat.' . $room->id,
    ]);

    $response->assertStatus(200);
}

public function test_unauthorized_user_cannot_access_private_chat_channel()
{
    $user = User::factory()->create();
    $room = ChatRoom::factory()->create();

    // User is not a member of this room

    $this->actingAs($user);

    $response = $this->post('/broadcasting/auth', [
        'socket_id' => '1234.1234',
        'channel_name' => 'private-chat.' . $room->id,
    ]);

    $response->assertStatus(403);
}
Security Considerations
Real-time features introduce specific security concerns:
Authentication and Authorization
Always use private or presence channels for sensitive data:
Broadcast::channel('user.{userId}', function ($user, $userId) {
    return (int) $user->id === (int) $userId;
});
Rate Limiting
Implement rate limiting on WebSocket connections and channel subscriptions:
// In a middleware
if ($request->user()->hasExceededWebSocketRateLimit()) {
    return response('Too Many Requests', 429);
}
CSRF Protection
Ensure your WebSocket authentication is protected from CSRF attacks:
// Include CSRF token in Echo configuration
window.Echo = new Echo({
    // Other configuration
    auth: {
        headers: {
            'X-CSRF-TOKEN': document.querySelector('meta[name="csrf-token"]').getAttribute('content')
        }
    }
});
Best Practices for Broadcasting
Keep Payloads Small
Minimize the data you broadcast to improve performance:
public function broadcastWith()
{
    return [
        'id' => $this->entity->id,
        'type' => 'update',
        // Only include necessary fields
    ];
}
Handle Reconnection Gracefully
WebSocket connections can drop. Implement robust reconnection logic:
Echo.connector.pusher.connection.bind('state_change', (states) => {
    if (states.current === 'disconnected') {
        console.log('Connection lost. Attempting to reconnect...');
    }

    if (states.previous === 'disconnected' && states.current === 'connected') {
        console.log('Reconnected. Refreshing data...');
        loadLatestData();
    }
});
Batch Updates for Efficiency
For frequently changing data, batch updates instead of broadcasting each change:
// Instead of broadcasting each update
$updates = collect();

foreach ($changedItems as $item) {
    $updates->push([
        'id' => $item->id,
        'value' => $item->value,
    ]);
}

// Broadcast a single batch update
broadcast(new BatchUpdate($updates));
Use Client-Side Prediction
For responsive UIs, update the interface immediately and then confirm with the broadcast:
// When user sends a message
function sendMessage(content) {
    // Optimistically add message to UI
    const tempId = 'temp-' + Date.now();
    addMessageToUI({
        id: tempId,
        content: content,
        pending: true
    });

    // Send to server
    axios.post('/messages', { content })
        .then(response => {
            // Replace temporary message with confirmed one
            replaceTempMessage(tempId, response.data);
        })
        .catch(error => {
            // Show error and remove temporary message
            removeTempMessage(tempId);
            showError('Failed to send message');
        });
}
Real-World Implementation Examples
Collaborative Document Editing
class DocumentUpdated implements ShouldBroadcast
{
    public $documentId;
    public $changes;
    public $userId;

    public function __construct($documentId, $changes, $userId)
    {
        $this->documentId = $documentId;
        $this->changes = $changes;
        $this->userId = $userId;
    }

    public function broadcastOn()
    {
        return new PresenceChannel('document.' . $this->documentId);
    }

    public function broadcastWith()
    {
        return [
            'changes' => $this->changes,
            'user_id' => $this->userId,
            'timestamp' => now()->timestamp,
        ];
    }
}
Client-side implementation:
// Join the document channel
const channel = Echo.join(`document.${documentId}`);

// Show who's editing
channel.here((users) => {
    updateUserList(users);
})
.joining((user) => {
    showUserJoined(user);
    updateUserList(addUser(user));
})
.leaving((user) => {
    showUserLeft(user);
    updateUserList(removeUser(user));
});

// Listen for changes
channel.listen('DocumentUpdated', (e) => {
    if (e.user_id !== currentUserId) {
        applyChangesToEditor(e.changes);
    }
});

// Send changes when user edits
editor.on('text-change', function(delta, oldDelta, source) {
    if (source === 'user') {
        axios.post(`/documents/${documentId}/changes`, {
            changes: delta
        });
    }
});
Real-time Bidding System
class BidPlaced implements ShouldBroadcast
{
    public $auction;
    public $bid;

    public function __construct(Auction $auction, Bid $bid)
    {
        $this->auction = $auction;
        $this->bid = $bid;
    }

    public function broadcastOn()
    {
        return new Channel('auction.' . $this->auction->id);
    }

    public function broadcastWith()
    {
        return [
            'amount' => $this->bid->amount,
            'bidder' => $this->bid->user->username,
            'time_remaining' => $this->auction->end_time->diffForHumans(),
        ];
    }
}
Client-side:
Echo.channel(`auction.${auctionId}`)
    .listen('BidPlaced', (e) => {
        updateCurrentBid(e.amount);
        updateBidHistory(e.amount, e.bidder);

        // If the auction is ending soon, show countdown
        if (isEndingSoon(e.time_remaining)) {
            showCountdown(e.time_remaining);
        }

        // If user has been outbid, show notification
        if (wasOutbid(e.amount)) {
            showOutbidNotification(e.amount);
        }
    });
Troubleshooting Common Issues
Authentication Issues
If clients can't authenticate to private channels:
- Check that you have the correct CSRF token in your requests
- Ensure the
BroadcastServiceProvideris registered - Verify your channel authorization callbacks in
routes/channels.php
Connection Issues
If clients can't connect:
- Check for CORS issues if your frontend is on a different domain
- Verify your Echo configuration matches your server settings
- Ensure your WebSocket server is running and accessible
Missing Broadcasts
If events aren't being broadcast:
- Confirm the event implements
ShouldBroadcast - Check that your queue workers are running if using queued broadcasting
- Verify the event is actually being dispatched (try logging before broadcast)
Conclusion
Laravel Broadcasting transforms static applications into dynamic, real-time experiences that users have come to expect from modern web applications. From simple notifications to complex collaborative interfaces, the possibilities are endless.
By leveraging Laravel's elegant abstractions over WebSocket technology, you can implement sophisticated real-time features without getting bogged down in the complexities of raw WebSocket handling. Whether you choose to use Pusher or self-host with Laravel WebSockets, the developer experience remains consistent and straightforward.
As you build real-time features, remember to consider security, scalability, and user experience. With careful planning and the techniques covered in this guide, your Laravel applications can deliver responsive, engaging real-time interactions that will delight your users.
Add Comment
No comments yet. Be the first to comment!